

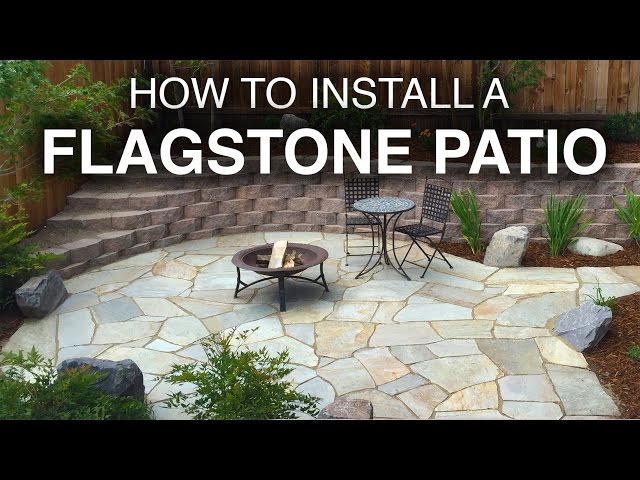
Installing a flagstone patio or path can give your landscape design a huge boost and really impress your guests (or customers if you happen to be a pro).
I love the natural feel they give to a landscape design. Instead of just using boring old paver blocks or even cement, flagstone will make your backyard more interesting and unique.
In this article, I’m going to share exactly how to install a flagstone patio (or path) easily and without the use of concrete or special tools.
Just like everything else, there is more than one way to get this job done. The method I’m showing you is optimized for a balance between simplicity of installation, longevity, and a high-quality professional look. So, not only will it be easy to install, it will last a lifetime.
Let’s get started…
Quick Disclaimer: Make sure to check local codes before installing anything in your home as your area may require a different process for building a patio. And be sure to use the proper safety equipment while using tools (gloves, eye protection, etc.).
Also, the links below are affiliate links. That means I receive a small commission if you click on them and buy (which I really appreciate). This does not cost you anything additional and it allows me to put out free information like this.
You’ll need the following tools:
- Flat nose shovel
- Spade shovel (this one’s pretty cool)
- Metal rake
- Wheelbarrow
- Hand Tamper or Plate Compactor
- Line Level
- Mason’s Line
- Stakes (wood or steel)
- Measuring Tape
- 4′ Level
- 5 gal. Bucket
- Small hand shovel
- Angle Grinder with Diamond Blade
- Mini Sledge
Step 1: Plan Your Patio
Besides the obvious considerations such as patio placement, size, and shape, here are a few more things to consider that aren’t so obvious.
Grading: You must build your patio so that it drains properly; otherwise, you’ll end up with puddling problems later. Never build your patio perfectly level. Instead, build it at a slight angle, so water easily drains off of it. That angle will be about 1/8″ of drop per foot of patio. You’ll want to take note of the existing landscape drainage on your property and work with that. (Watch the video for a more thorough explanation)
Stone Size: The bigger the stones, the less work you’ll have to do puzzling them together. However, bigger stones are heavier, thicker, and more expensive. So, find a stone size that works for you.
Stone Thickness: Thinner flagstone will tend to crack under heavy weight. Thicker flagstone is heavier and more expensive. If you’re building your patio in your backyard, then 1.5″-2″ thick flagstone is perfectly fine. If you’re building a driveway out of flagstone, you’ll want to go with stone at least 2″ thick and ideally thicker.
Irrigation Lines: If you plan on installing an irrigation system or even a gas fire pit, run the lines before building the patio. And, be sure to “call before you dig” so you don’t hit any existing lines in the process of building your patio.
Step 2: Dig

You’ll need to dig down far enough to accommodate 3-4″ of packed gravel base, 1″ of leveling material, plus the thickness of the pavers. That means in most cases you’ll want to dig down about 6″.
In some cases, you can add dirt surrounding the patio, but you’ll need to plan that out before you get started. If the patio is close to a building, don’t build up too high, or you’ll end up having dirt right up to the siding – which is a great way to get termites.
6″ is quite a bit, especially if you’re building a large patio, so you’ll want to consider what you are going to do with the dirt.
Step 3: Add 3-4″ of Packed Gravel Base
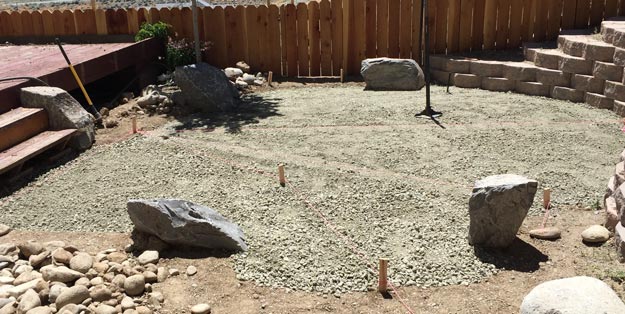
Unless you don’t mind an uneven patio, the gravel base is critical. It will keep your patio nice and flat for the long term and support your stones so they don’t crack and break. This is the patio’s foundation, and if you want a professional finished product, don’t skimp here.
Add the gravel 2″ at a time, and pack it down well before adding more. You can back it down using a hand tamper or a plate compactor. Either way, just make sure it’s packed down really well.
Outside wall cladding gray quartz thinner panel
If you’re building a flagstone driveway, you’ll want to go with 6″ of gravel base at a minimum.
Step 4: Install 1″ of Leveling Sand

Actually, you don’t want to use sand because you’ll need to walk on this layer a lot, and as you know, sand moves when you walk on it. So instead, you’ll want to use some crushed rock that includes the screenings.
Where I’m from, the best stuff to use is called Decomposed Granite (DG). This stuff looks similar to sand, but it packs down much better so you can walk on it. Since it’s composed of both bigger pieces of sand (1-2mm diameter) and fine dust, it’s able to pack down similar to dirt, but it’s still easy to level out, and weeds have a hard time growing in it.
Since this is the final layer before you start laying stones, you’ll want to make sure it’s flat and graded properly. So, use a mason line tied between stakes in the ground and a line level to set the grading just right and ensure a flat patio.
Once it’s level, spray with the hose to get it damp and pack it down thoroughly. Level again if you have to.
Step 5: Puzzle Together The Flagstone

Start by grabbing the larger stones and placing them around the perimeter of the patio. You want to use the larger stones on the outside because smaller stones will move and shift with time. Large stones will lock the smaller stones toward the center in place.
Then, start adding the rest of the stones to the center, working toward the middle of the patio. Cutting the stones is time-consuming and dusty, so spend a few minutes trying to puzzle them together, so you have to make as few cuts as possible.
Here’s a quick tip: The tighter and more consistent you try to make the seems, the longer it’s going to take because you’ll have to make waaaay more cuts. If you don’t mind bigger gaps, you’ll save a ton of labor, and you can get by with fewer stones to save some cash.
To cut the stones, you can use anything with a diamond blade on it. You see me using an angle grinder in the video, but there is a much easier way to cut the stones, which is to use a concrete saw with a larger diamond blade, as I demonstrate here.
Step 6: Level the Flagstone

Oh, you thought you were done? Ha! There’s still one step to go – leveling the stones.
Unless you don’t mind the flagstone shifting around as you walk or constantly tripping on edges, you’ll need to go stone by stone and level each one out. Since many of the stones will be uneven on the bottom, you’ll need to add some DG (decomposed granite) here and there and remove it in other places. You might even have to pick up a stone and make adjustments 5 or 6 times to get it sitting properly. That’s just how it goes.
I recommend having a bucket of DG and a small shovel handy, so you can quickly add and subtract DG as necessary.
To level each stone, start by placing a 4′ level on the stone to see how it sits relative to the grading you set and the other stones. Then simply make adjustments from there.
This step isn’t fun, but it gives you a very professional finish if you take your time (and lots of breaks).
Step 7: Fill In The Gaps

Now comes the easy part – filling in the gaps. You can use whatever you want for this step. You can use soil which would allow you to plant moss or something in the gaps. Or, you could just use more DG, which will help keeps weeds at bay.
Whatever you add, just make sure and spray it down with a hose to lock in the stones, and you’re ready to enjoy your hard work!
How to install a flagstone walkway
Building a flagstone walkway or path requires the same exact process.
Here’s a video that will show you this entire process compressed down to just 5 minutes. It should also be helpful for building your patio as well.


